Happy Sunday!
Today I want to show you how to make an easy book binding fun fold card. It’s the first time I’ve made this style of card and I’ve been meaning to try after receiving a book binding card from a fellow American demonstrator last year. Fun fold cards can seem intimidating but are often easier to make than you imagine.
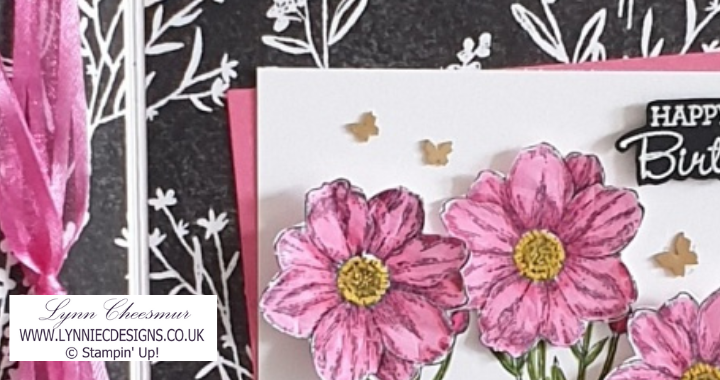
My starting point was Perfectly Pencilled 12″ x 12″ designer series paper, which has some beautiful floral line images but I chose to use one of the black and white designs. Looking through my stamp sets, I pulled out the Quiet Meadow stamp set as it has some lovely floral images that I think go well with the pretty patterned paper. Below is the first card I came up with.
The card is a little larger than normal measuring 5″ x 7″ and I think the pop of pink with black and white is rather classy. It was quite refreshing going back to basics and keeping the design simple. I enjoy colouring and using our Stampin’ Blends is quick and easy, although I’m no expert but you can’t really go wrong with simple stamped images like these.

For the second card, I wanted to keep it the same size but in landscape rather than portrait so put my thinking cap on as my cardstock was A4 in size. The solution was simply to use two pieces of card measuring 5″ x 7″ and glue them together, at the left hand side to create the book binding. After making the second card, I remembered the Global Design Project had a Theme Challenge #GDP347 this week and it’s all about Plants and Leaves.

It is fun to play along with these challenges so think I’ll enter the second card, as it’s a slightly stepped up version. If you read my blog post last week you know that I stamped and heat embossed quite a few Happy Birthday sentiments from Pansy Patch so fussy cut one for this card.
Supplies to make both cards
Stamps:
Quiet Meadow and Pansy Patch
Cardstock for card #1:
Thick Basic White 7” x 10” score one at 3⅞” and 5”
Basic White 2⅜” x 5⅝”
Polished Pink 2½” x 5¾”
Basic Black scrap
Perfectly Pencilled 12” x 12” dsp 4¾” x 6⅞” cut on short side at 1⅛”
Cardstock for card #2:
Thick Basic White 5” x 7” (x2) score one at 1¼”
Basic White 3” x 4” and 2½ x 4”
Polished Pink 3⅛” x 4⅛”
Basic Black scrap
Perfectly Pencilled 12” x 12” dsp 4⅞” x 6¾” cut on long side at 1⅛”
Inks:
Memento Black, Versamark
Accessories:
Brass Butterflies, Polished Pink Open Weave Ribbon, White Emboss Powder
Tools and Adhesives:
Stampin’ Blends (Daffodil Delight, Granny Apple Green, Polished Pink), Multipurpose Liquid Glue, Stampin’ Dimensionals, Tear & Tape, Trimmer, Paper Snips, Heat Tool
Instructions for card #1:
- Cut and score card base
- Trim dsp and glue to card front
- Add ribbon to book binding fold and adhere with tear & tape
- Stamp flowers and sentiment and colour flowers with Stampin’ Blends
- Layer stamped panel to Polished Pink card and add to base with dimensionals
- Add butterflies
Instructions for card #2:
- Score one piece of card base
- Trim dsp and glue to card front
- Add ribbon to book binding fold and adhere to card back with tear & tape
- Stamp flowers, colour with Stampin’ Blends and fussy cut
- Partially ink and stamp the leaves then colour with Stampin’ Blends
- Add flowers with glue and dimensionals
- Layer panel to Polished Pink card and add to base with glue
- Heat emboss sentiment, fussy cut and add with dimensionals
- Add butterflies
If you would like to see me make the second card over on my YouTube channel click below.
Thank you for visiting my blog today, I hope you enjoyed my projects and you’ve been inspired to try these easy fun fold cards. I’ve listed the products I used below so you can just click on the images to go directly to that item in my Stampin’ Up! on line store. Click here to learn how easy it is to shop with me 24/7 if you’re unsure.
I am grateful for your support – it helps me to keep crafting, blogging and creating content for my YouTube channel. If you live in the UK and don’t already have a Demonstrator I would love to be yours.
As always, thanks for stopping by and remember to keep it crafty.

Product List


")


 Open Weave Ribbon")