Hello crafty friends!
I am so excited to be joining the Be Inspired Design Team – this is my very first blog hop, and I couldn’t be more thrilled to be creating alongside such a talented group of Stampin’ Up! demonstrators from around the world!
This month’s theme is Floral Fun, and I couldn’t have asked for a better way to kick things off. Who doesn’t love a good flower moment?
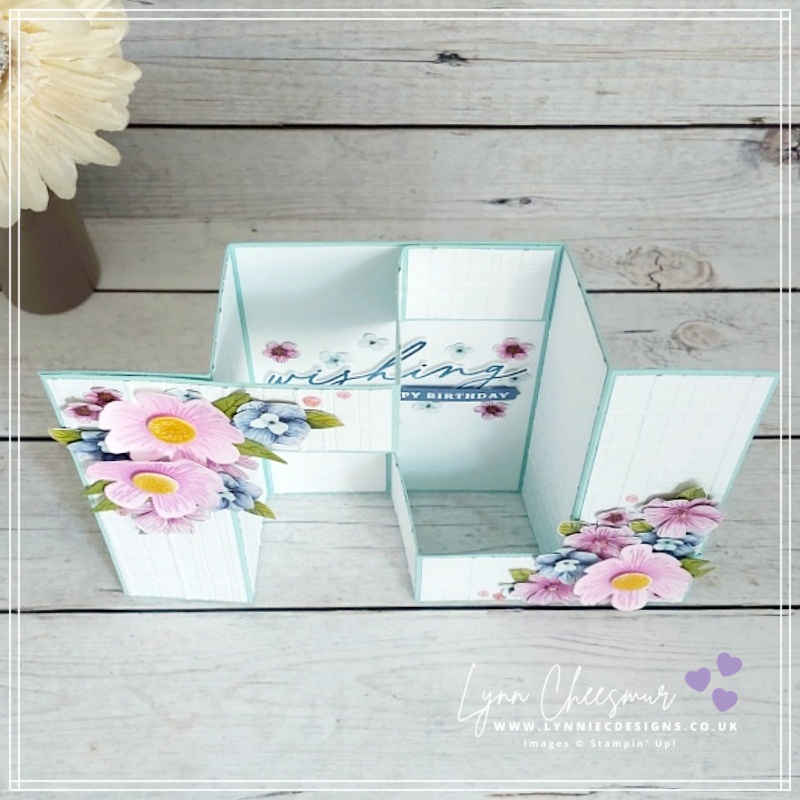
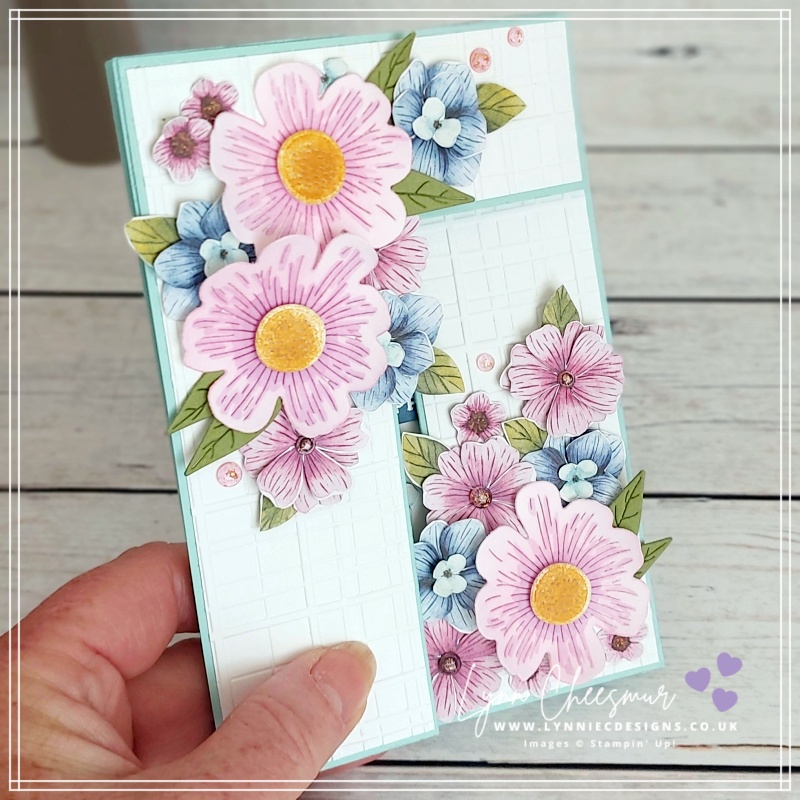
My Card – A Floral Fun Fold 🌼
To celebrate, I went all out with a Double Gatefold card with Z-folds. It’s a fun fold with lots of wow factor – perfect for showing off all the pretty florals!
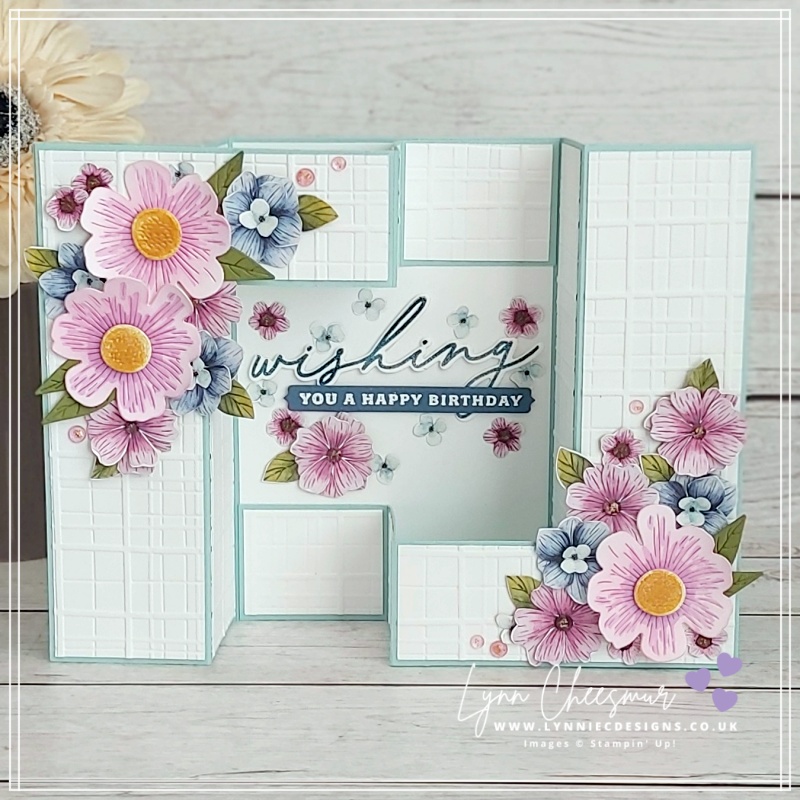
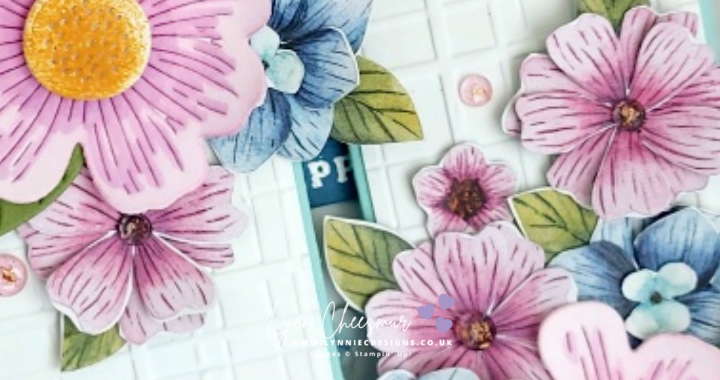
I used a mix of die cut and fussy cut flowers and leaves from the Impressions Abloom dies and the Floral Impressions 12″ x 12″ designer series paper. Forever Plaid 3D Embossing Folder creates the perfect textures background on the gatefolds and Z-fold panels. And the sentiments in the Delightful Wishes bundle were ideal.
In this post, I’ll walk you through everything you need to create your own double gatefold card with z-folds.
What Is a Double Gatefold Card?
A gatefold card opens in the centre with two side panels that unfold outward — like gates. A “double” version, like mine, typically includes an additional fold on each side, giving your card more dimension. And they fold flat to easily fit in an envelope for posting to your recipient.
Adding a couple of Z-folds
A Z-fold is made by folding cardstock into three sections in a zig-zag shape (like the letter “Z”). For my card, I added a Z-fold to each double gatefold so when folded, it gives a layered effect that opens up in stages, revealing a surprise message on the inside of the card.
Measurements:
- Pool Party – 6″ x 11½” scored at 1⅞”, 3¾”, 7¾” and 9⅝”
- Basic White – 1¾” x 5⅞” (x4) and 3⅞ x 5⅞”
- Pool Party – 1½” x 7¾” (x2)
- Basic White – 1⅜” x 3⅞” (x2) and 1⅜” x 1¾” (x4)
- Basic White – quarter sheet of A4 for stamping and die-cutting
- Misty Moonlight – scrap for sentiment
The first step is to cut and score the card base and Z-folds. Next cut and emboss the white panels with the Forever Plaid 3D embossing folder and glue them to the double gatefolds and Z-folds. Then using the Impressions Abloom dies, die cut the largest flower three times, and centres, before adding colour with sponge daubers and Stampin’ Blends to bring the blooms to life.
I had a great time fussy cutting a sheet of the Floral Impressions 2″ x 12″ designer series paper. The Z-folds give plenty of space to arrange the flowers, and when the gatefolds open there is a lovely surprise inside with heat embossed sentiments. Spare fussy cut flowers were sprinkled around the sentiment. The final step was adding pretty gems to add a bit of sparkle.
Keep Hopping for More Floral Fun!
I’m really excited to see what the rest of the team have created in the July Be Inspired Blog Hop. Next up is the very lovely Annette (aka Stampin’ With the Bees) in Canada. Click the banner below to go to her post. Be sure to click through and see what the rest of the team has created – there’s so much floral goodness waiting!

Thanks so much for stopping by and for celebrating this first hop with me. I can’t wait to share more with you each month! 🌷

Be Inspired Design Team Blog Roll:
- Maheswari Rajaguru
- Brian King
- Emma Goddard
- Heather Thomas
- Angela Meiritz-Reid
- Annette Elias
- Andrea Sargent
- Lynn Cheesmur (you are here 💜)
- Annette Ball
![Impressions Abloom Dies [ 165610 ]](https://assets1.tamsnetwork.com/images/EC042017NF/165610s.jpg "Impressions Abloom Dies [ 165610 ]")
![Floral Impressions 12" X 12" (30.5 X 30.5 Cm) Designer Series Paper [ 165603 ]](https://assets1.tamsnetwork.com/images/EC042017NF/165603s.jpg "Floral Impressions 12\" X 12\" (30.5 X 30.5 Cm) Designer Series Paper [ 165603 ]")
![Forever Plaid 3 D Embossing Folder [ 164049 ]](https://assets1.tamsnetwork.com/images/EC042017NF/164049s.jpg "Forever Plaid 3 D Embossing Folder [ 164049 ]")
![Pool Party A4 Card Stock [ 124391 ]](https://assets1.tamsnetwork.com/images/EC042017NF/124391s.jpg "Pool Party A4 Card Stock [ 124391 ]")
![Basic White A4 Cardstock [ 166781 ]](https://assets1.tamsnetwork.com/images/EC042017NF/166781s.jpg "Basic White A4 Cardstock [ 166781 ]")
![Misty Moonlight A4 Cardstock [ 153086 ]](https://assets1.tamsnetwork.com/images/EC042017NF/153086s.jpg "Misty Moonlight A4 Cardstock [ 153086 ]")
![Crushed Curry Classic Stampin' Pad [ 147087 ]](https://assets1.tamsnetwork.com/images/EC042017NF/147087s.jpg "Crushed Curry Classic Stampin' Pad [ 147087 ]")
![Misty Moonlight Classic Stampin' Pad [ 153118 ]](https://assets1.tamsnetwork.com/images/EC042017NF/153118s.jpg "Misty Moonlight Classic Stampin' Pad [ 153118 ]")
![Strawberry Slush Classic Stampin' Pad [ 165286 ]](https://assets1.tamsnetwork.com/images/EC042017NF/165286s.jpg "Strawberry Slush Classic Stampin' Pad [ 165286 ]")
![Versamark Pad [ 102283 ]](https://assets1.tamsnetwork.com/images/EC042017NF/102283s.jpg "Versamark Pad [ 102283 ]")
![Basics Wow! Embossing Powder [ 165679 ]](https://assets1.tamsnetwork.com/images/EC042017NF/165679s.jpg "Basics Wow! Embossing Powder [ 165679 ]")
![Fresh Freesia Stampin' Blends Combo Pack [ 155518 ]](https://assets1.tamsnetwork.com/images/EC042017NF/155518s.jpg "Fresh Freesia Stampin' Blends Combo Pack [ 155518 ]")
![Strawberry Slush & Pretty In Pink Gems [ 165615 ]](https://assets1.tamsnetwork.com/images/EC042017NF/165615s.jpg "Strawberry Slush & Pretty In Pink Gems [ 165615 ]")
![Sponge Daubers [ 133773 ]](https://assets1.tamsnetwork.com/images/EC042017NF/133773s.jpg "Sponge Daubers [ 133773 ]")
![Multipurpose Liquid Glue [ 154974 ]](https://assets1.tamsnetwork.com/images/EC042017NF/154974s.jpg "Multipurpose Liquid Glue [ 154974 ]")
![Stampin' Dimensionals [ 104430 ]](https://assets1.tamsnetwork.com/images/EC042017NF/104430s.jpg "Stampin' Dimensionals [ 104430 ]")
Such a wonderful and special card Lynn. It certainly is a wow card. Love it so much xxx
Ah thank you so much Andrea. I wanted to really go for it as I missed last months deadline. I can’t seem to put down Impressions Abloom at the moment, and I had to try this fun fold as soon as I saw it. xxx
Wowza! What a lovely card, Lynn! Total perfection! ♥
Thank you so much Brian. I’m so glad you like my card! I really wanted to pull it out of the bag for my first hop!
Such a stunning card, Lynn; it’s a real showstopper! x
Thank you so much Angela. I do love a fun fold x